Well I am starting out down that road too, my C++ is rusty, I know little about DX11, but what the hell, you have to start somewhere right? So if you fancy trying your hand at it to, check out my first post on the subject.
Thursday, 4 October 2012
Heads up!
As we have seen over the past few days, the future of this site seems uncertain, and so I have decided to archive my historical posts I have here; and have started to move them to a new blogspot blog which you can find here should this site go.
I am also starting to take a look at DirectX11 with C++, and have started a new blog here, so if you are interested in this area of development, then please feel free to pop by, take a look at what I am up to and comment as much as you like :)
I would also like to keep bloging about XNA as I love it so much, so I am intending to continue that here.
To all of you that have followed, commented and helped my out over my time here and with XNA, I thank you so very, very much, without you guys I would not have discovered so much, and to all the people I have met at events and user group meets, it has been a pleasure to have known such an enthusiastic and nice bunch of guys.
Thanks,
Charles.
2D Crepuscular (God) Rays
If you follow my blog, you know I have already covered this as a 3D implementation, well while having a nose on twitter, I spotted that x35mm (another XNA developer from the midlands :D) was writing what looked like a pretty cool hack and slash Ronin game for DBP, and I thought, that would look nice with some God rays to give it some more lighting details, so sent x35mm my 2D implementation of the God ray post process, and this is what he did with it:


Pretty cool eh :D
So, I am going to post here this 2D implementation. Keep in mind that this effect will not work on the WP7 device as it uses custom shaders to do what it needs to do, might have a look at a CPU implementation, but I reckon it will suck.
Overview
If you refer back to my post on this for 3D you will see all the same shaders, the difference in this 2D sample is the way the light mask is built. Effectively you need to render your light source, over that render the elements in your scene that are obscuring that source over the top in black to create the light mask, then apply the Crepuscular post processing effect. Then render the scene as you would normaly and then using an additive blend apply the god ray’s over the top.
1. Draw Light Source

Here the post processor is rendering the light mask at the position we want on the screen, as you can see I have put up a few keyboard controls you can use to alter the parameters to the effect, so you can move the light source around, alter the exposure, stuff like that.
2. Draw Light Mask

There are a few items in this scene, a number of “mountain” images which are just wrap able textures and a samurai head icon for my mouse pointer, all png’s so we can use the alpha channel on them to allow light to bleed through. The post process is then applied to this to make the light bleed past the edges of the mask to give the god ray effect.
3. Draw Scene

The scene is then drawn ready to be blended with the processed mask.
4. Combine Scene and Ray Images

Finally it’s all brought together to give the overall effect.
5. Animate It
So I am scrolling the mountains at different speeds to give the sense of movement over the terrain and moving the mouse icon to obscure the light showing how dynamic this technique is. Also at the same time altering the parameters as I go.
As you can see it renders at a good frame rate, 60fps, and this is at 900x1440 on my laptop. I have not personally ran this sample on my 360, buy x35mm has I believe.
Check out Dawn of the Ronin (pre god rays) here.
The solution for this sample can be found here.
I have also made an update to this so that the effect takes screen resolution into account here.
If you use this technique in your work, please let me know, be cool to see it used in the real world, just like x35mm has done in his game.
Pretty cool eh :D
So, I am going to post here this 2D implementation. Keep in mind that this effect will not work on the WP7 device as it uses custom shaders to do what it needs to do, might have a look at a CPU implementation, but I reckon it will suck.
Overview
If you refer back to my post on this for 3D you will see all the same shaders, the difference in this 2D sample is the way the light mask is built. Effectively you need to render your light source, over that render the elements in your scene that are obscuring that source over the top in black to create the light mask, then apply the Crepuscular post processing effect. Then render the scene as you would normaly and then using an additive blend apply the god ray’s over the top.
1. Draw Light Source

Here the post processor is rendering the light mask at the position we want on the screen, as you can see I have put up a few keyboard controls you can use to alter the parameters to the effect, so you can move the light source around, alter the exposure, stuff like that.
2. Draw Light Mask

There are a few items in this scene, a number of “mountain” images which are just wrap able textures and a samurai head icon for my mouse pointer, all png’s so we can use the alpha channel on them to allow light to bleed through. The post process is then applied to this to make the light bleed past the edges of the mask to give the god ray effect.
3. Draw Scene

The scene is then drawn ready to be blended with the processed mask.
4. Combine Scene and Ray Images

Finally it’s all brought together to give the overall effect.
5. Animate It
As you can see it renders at a good frame rate, 60fps, and this is at 900x1440 on my laptop. I have not personally ran this sample on my 360, buy x35mm has I believe.
Check out Dawn of the Ronin (pre god rays) here.
The solution for this sample can be found here.
I have also made an update to this so that the effect takes screen resolution into account here.
If you use this technique in your work, please let me know, be cool to see it used in the real world, just like x35mm has done in his game.
XNA with BulletSharp Physics Engine
Did a quick clip to show the progress of my current engine as I have started to put a third party physics engine in. For years I have struggles and struggled with writing my own, with some success, but to be honest, I never could quite get it right. So I have took it on the chin and decided to go with a third party engine. I chose BulletSharp as it’s the physics engine used in ST Excalibur. In this clip I have the engine with a load of cubes, a sphere and terrain. As expected the lighting is deferred, with a single shadow casting light source.
Simple Active Tiles using XNA on WP7
So another quick post I want to do is on using active tiles in XNA, or rather how you instantiate them in you WP7 application using XNA, like in the last post we have to have the assets in the project rather than the content project.
So, simply enough I created a method called SetTile, this will create the active tile for you, so when your game is pinned it will display the tile and the information you want on it. I used the same sample I did last time to implement this so it’s all rolled in with the ringtone source.
So you could call the method like this:
So, now when you pin your application you can get something like this when the tile flips:


Naturally you would have much better icons and messages on your tiles, but you could use this to show the players last high score, or there current progress in a currently saved game etc..
Source can be found here [Not Yet Uploaded]
So, simply enough I created a method called SetTile, this will create the active tile for you, so when your game is pinned it will display the tile and the information you want on it. I used the same sample I did last time to implement this so it’s all rolled in with the ringtone source.
public void SetTile(string title, string data, string tileAsset)
{
ShellTile tile = ShellTile.ActiveTiles.First();
if (tile != null)
{
StandardTileData tileUpdate = new StandardTileData
{
BackTitle = title,
BackContent = data,
BackBackgroundImage = new Uri(tileAsset, UriKind.Relative)
};
tile.Update(tileUpdate);
}
}
{
ShellTile tile = ShellTile.ActiveTiles.First();
if (tile != null)
{
StandardTileData tileUpdate = new StandardTileData
{
BackTitle = title,
BackContent = data,
BackBackgroundImage = new Uri(tileAsset, UriKind.Relative)
};
tile.Update(tileUpdate);
}
}
SetTile("Ringtones", "Play them or save them", "Tile.jpg");


Naturally you would have much better icons and messages on your tiles, but you could use this to show the players last high score, or there current progress in a currently saved game etc..
Source can be found here [Not Yet Uploaded]
Ringtones on WP7 using XNA
So, I did a sample for a friend a while back on how to add ringtones to a WP7 title that has been written in XNA. As we all know if you are writing it in Silverlight, there are plenty of samples out there, but I never spotted one for XNA. So I wrote this, as ever I may well be going about it in a cack handed manner, so please feel free to comment and/or correct anything you see in this post by adding a comment below. Thanks.
For this sample, the first thing I did was create some ring tones, now I did this in a very simplistic manor, I got a copy of Hammerhead and just used a few samples off that, 4 ring tones.
Now in XNA, we normally just throw our assets into the content pipeline and it sorts it all out for us, but due to the way MS have implemented ringtones we can’t just do that in XNA, we have to have them in the content pipeline as wav’s and as they are intended to be in the game project it’s self as mp3’s. This is all due to the lack of control XNA has compared with the Silverlight implementation over the MediaPlayer, read into that what you will…
[EDIT]Just found this post, which will get around this :S [/EDIT]
So, with my 4 new super duper ring tones my project(s) look like this:

Here is a quick shot of the code in my Update method
When playing your ring tones, you don’t want the media player playing at the same time, this situation is probably the only time you can just pause the media player…
I am not going to go over the code that renders the ringtone options, just show you the method used to play and to save the ringtones to the device.
Play a Ringtone
The sender is the object that has been taped, so the play button for a given ring tone, this has a tag with the ring tone number to be played, you could put the full ring tone name in there if you liked. I then get that into a SoundEffect object and play it, this is a global SoundEffect object as I only want to play 1 at any given time and may want to stop it mid play.

Save a Ringtone
The method to save a ring tone, first checks we are not in trial, and if not then allows the user to save the ringtone, this is why I put the mp3’s in the game project so they are accessible from “appdata:/”. The SaveRingToneTask Show method is then called:

The srt_Completed call back method then informs the user if it’s all gone well.
So that’s about it, my way of saving/playing ringtones on WP7 in XNA. As ever, comments are more than welcome…
Source code can be found here [Not yet uloaded]
For this sample, the first thing I did was create some ring tones, now I did this in a very simplistic manor, I got a copy of Hammerhead and just used a few samples off that, 4 ring tones.
Now in XNA, we normally just throw our assets into the content pipeline and it sorts it all out for us, but due to the way MS have implemented ringtones we can’t just do that in XNA, we have to have them in the content pipeline as wav’s and as they are intended to be in the game project it’s self as mp3’s. This is all due to the lack of control XNA has compared with the Silverlight implementation over the MediaPlayer, read into that what you will…
[EDIT]Just found this post, which will get around this :S [/EDIT]
So, with my 4 new super duper ring tones my project(s) look like this:

Here is a quick shot of the code in my Update method
// Allows the game to exit
if (GamePad.GetState(PlayerIndex.One).Buttons.Back == ButtonState.Pressed)
{
// If it's paused, start it back up again...
if (MediaPlayer.State == MediaState.Paused)
MediaPlayer.Resume();
this.Exit();
}
// First of all, and this is probably the only situation you can do this
// Pause the media player if it is playing, this will also pause the
// users own music, might be work you wanrning them before you enter
// your ring tone screen
if (MediaPlayer.State == MediaState.Playing)
{
MediaPlayer.Pause();
}
I am not going to go over the code that renders the ringtone options, just show you the method used to play and to save the ringtones to the device.
Play a Ringtone
class ScreenSprite { }
public void playThisRingTone(object sender)
{
ScreenSprite thisRT = (ScreenSprite)sender;
if (playingRTNo != -1)
{
ringTonesText[playingRTNo].Shadow = true;
ringTonesText[playingRTNo].Color = Color.Red;
}
int rt = int.Parse(thisRT.Tag);
playingRTNo = rt;
// Play the RT.
if (playingRT != null && playingRT.State == SoundState.Playing)
playingRT.Stop();
playingRT = Content.Load<SoundEffect>(string.Format("Audio/Ringtones/RingTone {0}", rt + 1)).CreateInstance();
ringTonesText[rt].Shadow = false;
ringTonesText[rt].Color = Color.DarkRed;
playingRT.Play();
}

Save a Ringtone
public void SaveRingTone(string ringtone)
{
try
{
if (!Guide.IsTrialMode)
{
SaveRingtoneTask srt = new SaveRingtoneTask();
srt.Completed += new EventHandler<TaskEventArgs>(srt_Completed);
srt.Source = new Uri(string.Format("appdata:/{0}", ringtone));
srt.DisplayName = "";
srt.IsShareable = true;
srt.Show();
}
else
{
dialogButtons.Clear();
dialogButtons.Add("OK");
Guide.BeginShowMessageBox("Trial Mode",
"Purchase the full game to get the ringtones",
dialogButtons, 0, MessageBoxIcon.Alert, null, null);
}
}
catch (Exception e)
{
dialogButtons.Clear();
dialogButtons.Add("OK");
Guide.BeginShowMessageBox("Error",
e.Message,
dialogButtons, 0, MessageBoxIcon.Alert, null, null);
}
}
void srt_Completed(object sender, TaskEventArgs e)
{
switch (e.TaskResult)
{
//Logic for when the ringtone was saved successfully
case TaskResult.OK:
dialogButtons.Clear();
dialogButtons.Add("OK");
Guide.BeginShowMessageBox("Ringtone Saved",
"The ringtone was saved successfully",
dialogButtons, 0, MessageBoxIcon.Alert, null, null);
break;
//Logic for when the task was cancelled by the user
case TaskResult.Cancel:
break;
//Logic for when the ringtone could not be saved
case TaskResult.None:
dialogButtons.Clear();
dialogButtons.Add("OK");
Guide.BeginShowMessageBox("Can't Save..",
"Can't save this ringtone",
dialogButtons, 0, MessageBoxIcon.Alert, null, null);
break;
}
}
{
try
{
if (!Guide.IsTrialMode)
{
SaveRingtoneTask srt = new SaveRingtoneTask();
srt.Completed += new EventHandler<TaskEventArgs>(srt_Completed);
srt.Source = new Uri(string.Format("appdata:/{0}", ringtone));
srt.DisplayName = "";
srt.IsShareable = true;
srt.Show();
}
else
{
dialogButtons.Clear();
dialogButtons.Add("OK");
Guide.BeginShowMessageBox("Trial Mode",
"Purchase the full game to get the ringtones",
dialogButtons, 0, MessageBoxIcon.Alert, null, null);
}
}
catch (Exception e)
{
dialogButtons.Clear();
dialogButtons.Add("OK");
Guide.BeginShowMessageBox("Error",
e.Message,
dialogButtons, 0, MessageBoxIcon.Alert, null, null);
}
}
void srt_Completed(object sender, TaskEventArgs e)
{
switch (e.TaskResult)
{
//Logic for when the ringtone was saved successfully
case TaskResult.OK:
dialogButtons.Clear();
dialogButtons.Add("OK");
Guide.BeginShowMessageBox("Ringtone Saved",
"The ringtone was saved successfully",
dialogButtons, 0, MessageBoxIcon.Alert, null, null);
break;
//Logic for when the task was cancelled by the user
case TaskResult.Cancel:
break;
//Logic for when the ringtone could not be saved
case TaskResult.None:
dialogButtons.Clear();
dialogButtons.Add("OK");
Guide.BeginShowMessageBox("Can't Save..",
"Can't save this ringtone",
dialogButtons, 0, MessageBoxIcon.Alert, null, null);
break;
}
}

The srt_Completed call back method then informs the user if it’s all gone well.
So that’s about it, my way of saving/playing ringtones on WP7 in XNA. As ever, comments are more than welcome…
Source code can be found here [Not yet uloaded]
Android NDK Beginner’s Guide

First thing that got me about this book was the comprehensive installation instructions, covering the installation of the JDK (Java Development Kit), Android SDK (Software Development Kit), Android NDK (Native Development Kit) and the IDE (Eclipse) across a number of platforms, Windows PC, Mac OS X and Linux PC. Now this it great as it’s sure to cover all those wanting to develop on this platform, but does lead to a lot of page skipping, but I guess that can’t be helped.
Having already played with Eclipse and the Android SDK, I only had to install the NDK and refresh what I already had installed (indigo upgrade), but still it’s a lot of work to get this all lined up for Android development, really makes you appreciate Visual Studio and all it’s quirks. Another draw back as a VS developer is all the command line compilation, but once you are all set up you can then get into the book samples.
Anyway, back to the book and it’s content, from the off you get to command line compile some samples and see them running on the Android, then into the IDE (Eclipse) and creating your first simple project in eight pretty simple steps. Then onto the C/C++ integration, now, it may well have been me but I found an issue when trying to set javah.exe up as described in the book, just in case you also have the same issue, here is the arguments string that I ended up using to generate my header file:
-jni -verbose -d ${workspace_loc:/MyProject/jni} -classpath ${workspace_loc:/MyProject/bin/classes/} com.myproject.MyActivity
I think the only other suggestion I would have would be how the code is rendered, it may well be different in a physical book (I have an ebook) but it would have been nice if tabulation and syntax highlighting was used. Other than that I have enjoyed it :)
Development Book Review
I have recently come across a number of books that are published by Packt Publishing, a couple related to XNA and one for the Android platform. All three perked my interest, the later as I have done a small amount of Android development for work in Java, but I started out as a C/C++ programmer so I thought it would be cool to check this book out as it covers Android development using C/C++
Here are the books I am going to cover in the next three posts.


Hope you find the reviews useful :)
Here are the books I am going to cover in the next three posts.
XNA 4.0 Game Development by Example: Beginner's Guide – Visual Basic Edition
Windows Phone 7 XNA Cookbook
Android NDK Beginner’s Guide
Hope you find the reviews useful :)
SSAO & Water as a Post Process: My worst video ever?
Possibly my worst video :S SSAO may not be right, water not finished and bad model port. But, it's where I am with these shaders. Would like to thank Ed for the model port so i could export it from Blender and Manzo for the music :)
As ever let me know what you think of it
A Quick Note On Binary Serialization
So was playing about with Binary serialization, and think I have a nice base class you might want to use if you ever want serialize your classes. This is the base class
using System;
using System.Collections.Generic;
using System.Linq;
using System.Text;
using System.Reflection;
using System.Runtime.Serialization;
using System.Runtime.Serialization.Formatters.Binary;
using System.IO;
namespace SerializationXNA
{
[Serializable]
public class SerializableBase<T> : ISerializable
{
/// <summary>
/// ctor
/// </summary>
public SerializableBase() { }
/// <summary>
/// ctor
/// </summary>
/// <param name="info">Data to be serialized</param>
/// <param name="context">Streaming context</param>
public SerializableBase(SerializationInfo info, StreamingContext ctxt)
: this()
{
PropertyInfo[] properties = this.GetType().GetProperties();
int propertyCount = properties.Length;
for (int p = 0; p < propertyCount; p++)
properties[p].SetValue(this, info.GetValue(properties[p].Name, properties[p].PropertyType), null);
}
/// <summary>
/// Method to serialize the object
/// </summary>
/// <returns></returns>
public static byte[] Serialize(T objectInsatnce)
{
BinaryFormatter formatter = new BinaryFormatter();
MemoryStream memStream = new MemoryStream();
formatter.Serialize(memStream, objectInsatnce);
byte[] buffer = memStream.ToArray();
memStream.Close();
return buffer;
}
/// <summary>
/// Method to deserialize the object from a byte array
/// </summary>
/// <param name="buffer">byte array holding the serialized object</param>
/// <returns>Deserialized instance of the object</returns>
public static T Deserialize(byte[] buffer)
{
BinaryFormatter formatter = new BinaryFormatter();
MemoryStream memStream = new MemoryStream(buffer);
T retVal = (T)formatter.Deserialize(memStream);
memStream.Close();
return retVal;
}
/// <summary>
/// Needed to do binary serailization of this object
/// </summary>
/// <param name="info">Data to be serialized</param>
/// <param name="context">Streaming context</param>
public virtual void GetObjectData(SerializationInfo info, StreamingContext context)
{
PropertyInfo[] properties = this.GetType().GetProperties();
int propertyCount = properties.Length;
for (int p = 0; p < propertyCount; p++)
info.AddValue(properties[p].Name, properties[p].GetValue(this, null));
}
}
}
Not a great deal in there other than it has to have the Serializable class attribute and implement the ISerializable interface and uses a generic in it’s definition, there are two constructors, the second needed for de-serialization. We then have Serialize and Deserialize statics, both methods do exactly what they say and then finally we implement the ISerializable method GetObjectData.
So pretty simple stuff, this is how you can then derive from this to then use all the lovely serialization stuff in the base class
using System;
using System.Collections.Generic;
using System.Linq;
using System.Text;
using System.Runtime.Serialization;
namespace SerializationXNA
{
[Serializable]
public class SerializableClass : SerializableBase<SerializableClass>
{
public bool IsDirty { get; set; }
public string Name { get; set; }
public Dictionary<string, object> ObjDictionary { get; set; }
public List<string> StringList { get; set; }
public SerializableClass()
{
IsDirty = false;
Name = string.Empty;
ObjDictionary = new Dictionary<string, object>();
StringList = new List<string>();
}
public SerializableClass(SerializationInfo info, StreamingContext ctxt)
: base(info, ctxt)
{ }
}
}
As you can see a pretty simple class, has 4 properties and a couple of constructors, but as we have derived from SerializableBase class we get all the serializable goodness, so this is how you could implement it
SerializableClass classToSerialize = new SerializableClass();
classToSerialize.IsDirty = true;
classToSerialize.Name = "Date To serialize";
classToSerialize.ObjDictionary.Add("One", "One");
classToSerialize.ObjDictionary.Add("Two", 3);
classToSerialize.StringList.Add("Hello");
classToSerialize.StringList.Add("World");
byte[] buffer = SerializableClass.Serialize(classToSerialize);
SerializableClass deserializedClass = SerializableClass.Deserialize(buffer);
deserializedClass.Name = "Deserialized data";
The great thing about this is that you can go and add as many properties as you like and you wont have to change any of the serialization code as it will automatically pick up the new properties :)
EDIT
Just altered the base class so it’s now WP7 friendly, I guess you could go 100% with the DataContractSerializer though…
using System;
using System.Collections.Generic;
using System.Linq;
using System.Text;
using System.Reflection;
using System.Runtime.Serialization;
#if WINDOWS
using System.Runtime.Serialization.Formatters.Binary;
#endif
using System.IO;
namespace SerializationXNA
{
#if WINDOWS
[Serializable]
#endif
public class SerializableBase<T>
#if WINDOWS
: ISerializable
#endif
{
/// <summary>
/// ctor
/// </summary>
public SerializableBase() { }
#if WINDOWS
/// <summary>
/// ctor
/// </summary>
/// <param name="info">Data to be serialized</param>
/// <param name="context">Streaming context</param>
public SerializableBase(SerializationInfo info, StreamingContext ctxt)
: this()
{
PropertyInfo[] properties = this.GetType().GetProperties();
int propertyCount = properties.Length;
for (int p = 0; p < propertyCount; p++)
properties[p].SetValue(this, info.GetValue(properties[p].Name, properties[p].PropertyType), null);
}
#endif
/// <summary>
/// Method to serialize the object
/// </summary>
/// <returns></returns>
public static byte[] Serialize(T objectInsatnce)
{
#if WINDOWS
BinaryFormatter formatter = new BinaryFormatter();
#else
DataContractSerializer formatter = new DataContractSerializer(typeof(T));
#endif
MemoryStream memStream = new MemoryStream();
#if WINDOWS
formatter.Serialize(memStream, objectInsatnce);
#else
formatter.WriteObject(memStream, objectInsatnce);
#endif
byte[] buffer = memStream.ToArray();
memStream.Close();
return buffer;
}
/// <summary>
/// Method to deserialize the object from a byte array
/// </summary>
/// <param name="buffer">byte array holding the serialized object</param>
/// <returns>Deserialized instance of the object</returns>
public static T Deserialize(byte[] buffer)
{
#if WINDOWS
BinaryFormatter formatter = new BinaryFormatter();
#else
DataContractSerializer fomratter = new DataContractSerializer(typeof(T));
#endif
MemoryStream memStream = new MemoryStream(buffer);
#if WINDOWS
T retVal = (T)formatter.Deserialize(memStream);
#else
T retVal = (T)fomratter.ReadObject(memStream);
#endif
memStream.Close();
return retVal;
}
#if WINDOWS
/// <summary>
/// Needed to do binary serailization of this object
/// </summary>
/// <param name="info">Data to be serialized</param>
/// <param name="context">Streaming context</param>
public virtual void GetObjectData(SerializationInfo info, StreamingContext context)
{
PropertyInfo[] properties = this.GetType().GetProperties();
int propertyCount = properties.Length;
for (int p = 0; p < propertyCount; p++)
info.AddValue(properties[p].Name, properties[p].GetValue(this, null));
}
#endif
}
}
WP7 game/app talking to WCF Web Services
This post is taken from the discussion we had on the forum here. So, the OP was asking about WCF web services and I replied with my 2 peneth and said I would write a blog post about it, and this is where I will start.
Stuff You Will Need (Other than the dev tools)
I use TSOHost for all my web hosting, have my domain registered with them and they also serve my web site there. I chose these guys as at the time they gave all I needed in there basic package for ASP.NET and must say I have not a bad word to say about them. Any tech issues I have had; they have responded and resolved in no time at all. Now if I was you, I wouldn’t just take these guys up, I would have a good look round first, make sure you get a good deal.
Create Database
So once you are registered, have your domain up and running, you will want to set up a DB on the server, now I can only show you how I do it with the host I use, it will differ if you use another company to host your site.
From the dashboard the host provide me with I can get to my MySQL DB stuff and set up a new DB

This then gives me the server side IP address for the database so I can then connect to it from my service, we will need this later, don’t worry about it for now, just know we will need it later.
I now need to set up a user for this DB, again from the control panel the host has provided I can do this.

Now we have a database and a user that can access it, what we now need is a table that can be used to store data. Again from the hosts dashboard I can go and create a table in my new DB

Now with the table created I need to create the columns that will be in it.

So, my two columns are Country and Count. So we now have a table set up which will look something like this

Service Creation
Now we need to create a web service to be hosted from our site and have access to the new DB and it’s table(s). We will also have to get some assemblies so we can connect and use a MySQL database, but lets get the basic service project going for now.
Open up VS2010 and create a new Web Site,

As far as creating a WCF web service, you have just done it; it wont do what you want it to yet, but the default project comes with basic stubs so you could run it as it stands and it would run the service. But we don’t want that…
Creating Web Methods
So, we now want to give the service some methods so we can act on the database. First thing I am going to do is rename the source files to reflect this service better.

I am also going to clear out all the stuff we don’t need from this project, all the template code can go really, so in the IRCTestService.cs (was IService.cs) I am removing everything from line 23 on wards, we wont be needing that data contract, we will create our own ones in a moment. I am also going to remove ALL the operational contracts from the interface in this file too, we now have a pretty naked looking file
But that’s how we want it, ready for us to put our functionality in it. Just so we have all our ducks in a row, clean out the RCTestService.cs file to so it looks like this
Now, make sure that the RCTestService.svc (was Service.svc) file is using the right class now we have renamed it, like this
Before we can write our first web method we need to understand how we are going to package the data and send it to and from the client, this is done with data contracts, so the first data contract we want will have information in it that we want to have stored on the server. More importantly for me I like to have a base class for all my requests and responses, so lets first create a BaseRequest data contract. Create a new folder file in the App_Code folder and call it DataContracts (nice to keep tidy), then in there create a new class called RequestBase , make sure you specify that the class is a data contract (you have to type it in above the class definition) like this

In this class I am going to have it store a user name and password, we won’t really be doing much validation as this is a simple project, but just to show you how you might want to set it up. So your RequestBase class should now look like this, note you have to specify that the members are Data Members
We now have a base request object, we are now going to create an UpdateRequest data contract, so we can send the client data to the service and it can be stored in the database. In the same folder as the RequestBase.cs file, create another new class called UpdateRequest.cs, derive from RequestBase and add in the fields we want to store in the DB, it should look something like this when you are done
Now we need to add our first web method, in the interface (IRCTestService.cs) we are going to create our first method like this
We then need to implement this in the service. I am also going to add in some very simple validation, naturally you would be a lot more exhaustive on a real server. Your RCTestService.cs should now look something like this

Hit OK, it’s so we can debug the service, we can remove this later, it just adds a setting to the web.config file. So you should then get a screen a little like this
If you get a screen like this

Click the RDTestService.svc file, this is the actual service we want to make sure runs.
Congratulations you have just written your own WCF service!! Still does not do all we need though, and now we will look at how we will interact with the database :)
MySQL
So, we now need to get the MySQL assemblies so we can connect to the DB, you can find the download you needhere. Download and install the msi, I had to uninstall an older version, you may need to do the same.
Once installed you can then reference the MySQL assemblies in your project, right click on the project and select Add Reference like this

In the Add Reference popup, select the .NET tab, wait about 9 hours (not that long really :P) then go find the MySQL.Data reference and add that to your project like this

Now we have registered the MySQL assemblies we can go on to create a class that will handle all our communications with the database. In the App_Code folder create a Utilities folder, in there create a class called DBUtility and add using statements for System.Data, MySql.Data and MySql.Data.MySqlClient like this
Now we are going to add a database connection object, alter the constructor to initialize it and add a method to use it like this
As you can see in this sample I am using IDbConnection interface rather than a MySQLConnection, this is so later (if I get around to it) we will expand this class so it can connect to databases of other types like MSSql, Oracle and other OleDB types.
So, now we have all this set up we can code up our web method to update the table for us. To the RCTestService.cs we are going to add an instance of DBUtility, in the service constructor, initiate it and then use it in our web method to update the database. In order to do this we are going to set up some values in the web.config file, we are going to add an appSettings section and give it two keys, Server and Port like this
These values will be populated with the server and port number your data base is on, you can find this value in the MySQL Databases tab on your hosted control panel. I do this as you can test your service while running from your home machine, but you will need to swap the server and port numbers for those used for remote access, you will also need to set up your IP address so it will be allowed to talk to the server during testing, all this is pretty simple on my hosts control panel, just goto the MySQL Remote Access tab.
So, now we have our server and port configured we can set up the connection object in the service constructr like this
And we can then update our UpdateServer web method like this
So, what I am doing here, is first checking if we have any records for this country type, if we have then we update that row with a new count value, if we don’t then we insert a new row.
We can also add a new web method now to get us all the data in the table so we ca display it on our client. Before we do this we need to create a decent response object so we can bundle all that data up and pass it back to the client in a nice tidy manner. We do this with another data contract, but first we will create a ResponseBase and then derive from that.
As before in the DataContracts folder create a new class, but this time call it ResponseBase like this
We can use this response object in our existing web method, so we can inform the client if all went well or if there was an issue, first we update the service interface so it looks like this
Then alter the web method like this
Now onto our new web method, GetAll, this will need a specific response object, but first we need a class to store our data.
Create a new folder called DataObjects, in there create a class called TableData like this
This class will store the two columns we need for each record, I have given it 3 constructors so I can be lazy when creating the objects, but you can define yours how ever you need to.
Now again, create a new class in the DataContracts folder called GetAllResponse deriving from ResponseBase like this
In here we have a list of TableData and a constructor that will populate the object from a DataRowCollection, again so I can be lazy and just pass in the rows from the dataset :)
Now we can create our new Web method to get it all for us, in the interface, set up the call like this
We can then write the web method in the service located in the RCTestService.cs file like this
Now we can add the logic like this
Publish the Web Service
So, now we are going to put the service up on the interwebz so your applications can access it. First of all, if you did use the debug/remote access server address and port in your web.config file, switch it to the live IP and port now, if you forget, most FTP clients will let you edit files on the server, so it’s no big issue, just makes it a bit easier if you do it now.
Once you are all compiled and ready to go, you need to locate the MySql.Data.dll as this wont be present on the server, it will be in the GAC, so I found mine here “C:\Windows\Microsoft.NET\assembly\GAC_MSIL”, once you have located the assembly, create an ASP.NET Bin folder in the project ad copy the assembly across so it’s ready to go on the server, your solution should now look something like this

Now, I had a few issues setting mine up on my server as I had other web applications using an older version of the MySQL.Data.dll, to get round this I altered the reference to the assembly so it looked like this
This means it won’t look for a specific version of the assembly, I also have a Bin folder at a higher level to this service on my server, so I ended up having to use the older version. Also my host does not have Front Page Publishing enabled (probably because I didn’t ask for it) so I have had to set it all up manually rather than using the Publish Web site option in VS2010.
So, we have the project all lined up and ready to be served on our server, fire up your FTP client and connect to your host, create a folder to hold the service, I just used the folder name my project is in RCTestWCFService, then just copy it all up. We are still not done, we need to now go over to our control panel and set up the folder as a virtual directory. With my host it’s a pretty simple thing to do, go into the Virtual Directories option off the main menu screen, select the Add New Virtual Directory tab and enter the names you want as the alias and the name you just transferred the service to and click Create virtual directory.

One more step and we will have our service up and running and that’s to refresh your application pool, I think that by default on my host your site is in a shared application pool, but from the dashboard you can switch to an isolated one, then simply hit the refresh application pool button.
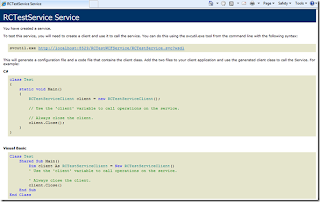
So, now (if I have not took it down yet) you should be able to go and see my version of this test service running from my site here http://www.randomchaos.co.uk/RCTestWCFService/RCTestService.svc which should look something like this

And if you click the link at the top you will get to see the WSDL for the service, which will look like this

So that’s that, you have created a simple WCF Web service, now to look at setting up a WP7 Client to access this service.
XNA WP7 Client
So as I hope you by know, I am pretty much 100% XNA on this blog, so I am going to create the WP7 client in pure XNA. So, create your XNA WP7 project as you normally would, we then need to add a service reference, right click on the project and click Add Service Reference

In the Address paste the address of your service and hit the Go button, once the service has been discovered you can change the namespace that will be used in your project, I named mine RCTestService, then click OK

And that’s it, it’s now bound to the service and we can now make the web service calls from the client.
In the Game1 class I create a reference to the service just above the constructor like this
Then in the Initialize method I am going to instantiate the service and bind callbacks to the asynchronous web methods we have. The methods appear as asynchronous as the WP7 uses the same Silverlight architecture (I am guessing) which forces the service calls to be asynchronous, if we were writing for a PC XNA game we could make synchronous calls. And if we were on the XBox, we could not bind to the service as the framework does not allow it for security reasons.
So our Initialize method now looks something like this and we have two new methods
I am going to create a bool so I know if I have updated the server and in the Update method if we have not done it, call the UpdateServer web method
Now, what if something goes wrong, then we sort of need a pop up message box to display any issues, so here is a method we can use to do that
So, with that we can then see how our call went and respond accordingly.
Now we have that call all wired up we can then take on the next one, but first we need to add a font to the content folder so we can show the results, we are also going to call the method every minute and display the updated data and we will hold this data in a list of TableData.
The variables we now have at the top of Game1 look like this
and our list of data is populated when the service returns like this
Now in the Update method we are going to set up the call to the service like this
So, now we are going to display on the screen the time till next check and the current data we have, so our draw call will now look like this
So, when our WP7 app connects to the service we get this

And once it has gone and got all, looks something like this

Silverlight WP7 Client
So, I am updating this post to include the silver light client code, I am new to Silverlight on the WP7, so please forgive how crude I have been writing this client. It’s pretty much the same steps as the XNA client, we add a reference to the service, just as before, but we set the service up in code in the MainPage constructor like this
And the callback methods are also pretty much the same
But as you can see I have had to do some extra work to be able to populate the TextBlock control from the callback. This is because the code calling the service method is being called from another thread. I am doing this as in Silverlight I don’t have a game loop, so as in XNA we can just up a check in the Update method, here I have fired off a new thread and do they check in there, the tread looks like this
Also the RunAsCrossThreadSafeCode is mine (well after I used Google to find out how to do it) and that method looks like this
As you can see it takes a CrossThreadCode delegate, again created at the top of the class like this

And that’s pretty much it really. I know it seems like a lot to sort out and to take in at first, but once you have written a few services you will love it, I do :) I know I may go around the houses and do stuff the long winded way, so if you read this and have any advice or tips to add then please feel free to comment and let us all know how you stream line the process. Or you know of a great host for ASP.NET, share that too. If you have any issues creating your WCF service then let us know, you never know we might be able to help :P
Hope I have not scared you off of confused you when it comes to creating services for your game, and I hope this post helps you realize the potential you have in your game with web services.
ALL the source is available here [Not yet uploaded]
Stuff You Will Need (Other than the dev tools)
- A host to serve your service
- A registered domain with said host
- An FTP client
I use TSOHost for all my web hosting, have my domain registered with them and they also serve my web site there. I chose these guys as at the time they gave all I needed in there basic package for ASP.NET and must say I have not a bad word to say about them. Any tech issues I have had; they have responded and resolved in no time at all. Now if I was you, I wouldn’t just take these guys up, I would have a good look round first, make sure you get a good deal.
Create Database
So once you are registered, have your domain up and running, you will want to set up a DB on the server, now I can only show you how I do it with the host I use, it will differ if you use another company to host your site.
From the dashboard the host provide me with I can get to my MySQL DB stuff and set up a new DB
This then gives me the server side IP address for the database so I can then connect to it from my service, we will need this later, don’t worry about it for now, just know we will need it later.
I now need to set up a user for this DB, again from the control panel the host has provided I can do this.

Now we have a database and a user that can access it, what we now need is a table that can be used to store data. Again from the hosts dashboard I can go and create a table in my new DB
Now with the table created I need to create the columns that will be in it.

So, my two columns are Country and Count. So we now have a table set up which will look something like this

Service Creation
Now we need to create a web service to be hosted from our site and have access to the new DB and it’s table(s). We will also have to get some assemblies so we can connect and use a MySQL database, but lets get the basic service project going for now.
Open up VS2010 and create a new Web Site,

As far as creating a WCF web service, you have just done it; it wont do what you want it to yet, but the default project comes with basic stubs so you could run it as it stands and it would run the service. But we don’t want that…
Creating Web Methods
So, we now want to give the service some methods so we can act on the database. First thing I am going to do is rename the source files to reflect this service better.
I am also going to clear out all the stuff we don’t need from this project, all the template code can go really, so in the IRCTestService.cs (was IService.cs) I am removing everything from line 23 on wards, we wont be needing that data contract, we will create our own ones in a moment. I am also going to remove ALL the operational contracts from the interface in this file too, we now have a pretty naked looking file
using System;
using System.Collections.Generic;
using System.Linq;
using System.Runtime.Serialization;
using System.ServiceModel;
using System.ServiceModel.Web;
using System.Text;
// NOTE: You can use the "Rename" command on the "Refactor" menu to change the interface name "IService" in both code and config file together.
[ServiceContract]
public interface IRCTestService
{
}
using System;
using System.Collections.Generic;
using System.Linq;
using System.Runtime.Serialization;
using System.ServiceModel;
using System.ServiceModel.Web;
using System.Text;
// NOTE: You can use the "Rename" command on the "Refactor" menu to change the class name "Service" in code, svc and config file together.
public class RCTestService : IRCTestService
{
}
<%@ ServiceHost Language="C#" Debug="true" Service="RCTestService" CodeBehind="~/App_Code/RCTestService.cs" %>

In this class I am going to have it store a user name and password, we won’t really be doing much validation as this is a simple project, but just to show you how you might want to set it up. So your RequestBase class should now look like this, note you have to specify that the members are Data Members
[DataContract]
public class RequestBase
{
[DataMember]
public string UserName { get; set; }
[DataMember]
public string Password { get; set; }
public RequestBase()
{
//
// TODO: Add constructor logic here
//
}
}
public class RequestBase
{
[DataMember]
public string UserName { get; set; }
[DataMember]
public string Password { get; set; }
public RequestBase()
{
//
// TODO: Add constructor logic here
//
}
}
[DataContract]
public class UpdateRequest : RequestBase
{
[DataMember]
public string Country { get; set; }
public UpdateRequest()
{
//
// TODO: Add constructor logic here
//
}
}
public class UpdateRequest : RequestBase
{
[DataMember]
public string Country { get; set; }
public UpdateRequest()
{
//
// TODO: Add constructor logic here
//
}
}
[ServiceContract]
public interface IRCTestService
{
[OperationContract]
void UpdateServer(UpdateRequest request);
}
public interface IRCTestService
{
[OperationContract]
void UpdateServer(UpdateRequest request);
}
public class RCTestService : IRCTestService
{
public void UpdateServer(UpdateRequest request)
{
if (ValidRequest(request))
{
// Do what we need to do
}
}
private bool ValidRequest(RequestBase request)
{
return true;
}
}
{
public void UpdateServer(UpdateRequest request)
{
if (ValidRequest(request))
{
// Do what we need to do
}
}
private bool ValidRequest(RequestBase request)
{
return true;
}
}

Hit OK, it’s so we can debug the service, we can remove this later, it just adds a setting to the web.config file. So you should then get a screen a little like this

If you get a screen like this

Click the RDTestService.svc file, this is the actual service we want to make sure runs.
Congratulations you have just written your own WCF service!! Still does not do all we need though, and now we will look at how we will interact with the database :)
MySQL
So, we now need to get the MySQL assemblies so we can connect to the DB, you can find the download you needhere. Download and install the msi, I had to uninstall an older version, you may need to do the same.
Once installed you can then reference the MySQL assemblies in your project, right click on the project and select Add Reference like this

In the Add Reference popup, select the .NET tab, wait about 9 hours (not that long really :P) then go find the MySQL.Data reference and add that to your project like this

Now we have registered the MySQL assemblies we can go on to create a class that will handle all our communications with the database. In the App_Code folder create a Utilities folder, in there create a class called DBUtility and add using statements for System.Data, MySql.Data and MySql.Data.MySqlClient like this
using System;
using System.Collections.Generic;
using System.Linq;
using System.Web;
using System.Data;
using MySql.Data;
using MySql.Data.MySqlClient;
/// <summary>
/// Summary description for DBUtility
/// </summary>
public class DBUtility
{
public DBUtility()
{
//
// TODO: Add constructor logic here
//
}
}
using System.Collections.Generic;
using System.Linq;
using System.Web;
using System.Data;
using MySql.Data;
using MySql.Data.MySqlClient;
/// <summary>
/// Summary description for DBUtility
/// </summary>
public class DBUtility
{
public DBUtility()
{
//
// TODO: Add constructor logic here
//
}
}
public class DBUtility
{
public IDbConnection CNN;
public DBUtility(string server,string port, string database,string userID,string password)
{
CNN = new MySqlConnection(string.Format("Data Source={0};Port={1};Database={2};User ID={3};Password={4}", server, port, database, userID, password));
}
public DataSet GetDataSet(string sql)
{
DataSet ds = new DataSet();
IDbDataAdapter da;
da = new MySqlDataAdapter(sql, (MySqlConnection)CNN);
da.Fill(ds);
return ds;
}
}
{
public IDbConnection CNN;
public DBUtility(string server,string port, string database,string userID,string password)
{
CNN = new MySqlConnection(string.Format("Data Source={0};Port={1};Database={2};User ID={3};Password={4}", server, port, database, userID, password));
}
public DataSet GetDataSet(string sql)
{
DataSet ds = new DataSet();
IDbDataAdapter da;
da = new MySqlDataAdapter(sql, (MySqlConnection)CNN);
da.Fill(ds);
return ds;
}
}
So, now we have all this set up we can code up our web method to update the table for us. To the RCTestService.cs we are going to add an instance of DBUtility, in the service constructor, initiate it and then use it in our web method to update the database. In order to do this we are going to set up some values in the web.config file, we are going to add an appSettings section and give it two keys, Server and Port like this
<?xml version="1.0"?>
<configuration>
<appSettings>
<add key="Server" value=""/>
<add key="Port" value=""/>
</appSettings>
<system.web>
<compilation debug="true" targetFramework="4.0">
<assemblies>
<add assembly="MySql.Data, Version=6.4.4.0, Culture=neutral, PublicKeyToken=C5687FC88969C44D"/>
</assemblies>
</compilation>
</system.web>
<system.serviceModel>
<behaviors>
<serviceBehaviors>
<behavior>
<!-- To avoid disclosing metadata information, set the value below to false and remove the metadata endpoint above before deployment -->
<serviceMetadata httpGetEnabled="true"/>
<!-- To receive exception details in faults for debugging purposes, set the value below to true. Set to false before deployment to avoid disclosing exception information -->
<serviceDebug includeExceptionDetailInFaults="false"/>
</behavior>
</serviceBehaviors>
</behaviors>
<serviceHostingEnvironment multipleSiteBindingsEnabled="true"/>
</system.serviceModel>
<system.webServer>
<modules runAllManagedModulesForAllRequests="true"/>
</system.webServer>
</configuration>
So, now we have our server and port configured we can set up the connection object in the service constructr like this
public class RCTestService : IRCTestService
{
protected DBUtility dbUtil;
public RCTestService()
{
dbUtil = new DBUtility(ConfigurationManager.AppSettings["Server"], ConfigurationManager.AppSettings["Port"], "randomch_testdb", "randomch_test", "test");
}
{
protected DBUtility dbUtil;
public RCTestService()
{
dbUtil = new DBUtility(ConfigurationManager.AppSettings["Server"], ConfigurationManager.AppSettings["Port"], "randomch_testdb", "randomch_test", "test");
}
public void UpdateServer(UpdateRequest request)
{
if (ValidRequest(request))
{
// Do we have any of this country?
string sql = string.Format("SELECT * FROM TestTable WHERE Country = '{0}'", request.Country);
DataSet ds = dbUtil.GetDataSet(sql);
// Update DB
if (ds != null && ds.Tables != null && ds.Tables.Count > 0 && ds.Tables[0].Rows.Count > 0)
sql = string.Format("UPDATE TestTable SET Count = {1} WHERE Country = '{0}'", request.Country, int.Parse(ds.Tables[0].Rows[0]["Count"].ToString()) + 1);
else
sql = string.Format("INSERT INTO TestTable VALUES('{0}',{1})", request.Country, 1);
dbUtil.GetDataSet(sql);
}
}
{
if (ValidRequest(request))
{
// Do we have any of this country?
string sql = string.Format("SELECT * FROM TestTable WHERE Country = '{0}'", request.Country);
DataSet ds = dbUtil.GetDataSet(sql);
// Update DB
if (ds != null && ds.Tables != null && ds.Tables.Count > 0 && ds.Tables[0].Rows.Count > 0)
sql = string.Format("UPDATE TestTable SET Count = {1} WHERE Country = '{0}'", request.Country, int.Parse(ds.Tables[0].Rows[0]["Count"].ToString()) + 1);
else
sql = string.Format("INSERT INTO TestTable VALUES('{0}',{1})", request.Country, 1);
dbUtil.GetDataSet(sql);
}
}
We can also add a new web method now to get us all the data in the table so we ca display it on our client. Before we do this we need to create a decent response object so we can bundle all that data up and pass it back to the client in a nice tidy manner. We do this with another data contract, but first we will create a ResponseBase and then derive from that.
As before in the DataContracts folder create a new class, but this time call it ResponseBase like this
using System;
using System.Collections.Generic;
using System.Linq;
using System.Runtime.Serialization;
using System.ServiceModel;
using System.ServiceModel.Web;
using System.Text;
/// <summary>
/// Summary description for ResponseBase
/// </summary>
[DataContract]
public class ResponseBase
{
[DataMember]
public bool Success { get; set; }
[DataMember]
public string Message { get; set; }
public ResponseBase()
{
Success = true;
}
}
using System;
using System.Collections.Generic;
using System.Linq;
using System.Runtime.Serialization;
using System.ServiceModel;
using System.ServiceModel.Web;
using System.Text;
// NOTE: You can use the "Rename" command on the "Refactor" menu to change the interface name "IService" in both code and config file together.
[ServiceContract]
public interface IRCTestService
{
[OperationContract]
ResponseBase UpdateServer(UpdateRequest request);
}
public ResponseBase UpdateServer(UpdateRequest request)
{
ResponseBase retVal = new ResponseBase();
try
{
throw new Exception("oops");
if (ValidRequest(request))
{
// Do we have any of this country?
string sql = string.Format("SELECT * FROM TestTable WHERE Country = '{0}'", request.Country);
DataSet ds = dbUtil.GetDataSet(sql);
// Update DB
if (ds != null && ds.Tables != null && ds.Tables.Count > 0 && ds.Tables[0].Rows.Count > 0)
sql = string.Format("UPDATE TestTable SET Count = {1} WHERE Country = '{0}'", request.Country, int.Parse(ds.Tables[0].Rows[0]["Count"].ToString()) + 1);
else
sql = string.Format("INSERT INTO TestTable VALUES('{0}',{1})", request.Country, 1);
dbUtil.GetDataSet(sql);
}
else
{
retVal.Success = false;
retVal.Message = "Invalid Request Credentials!";
}
}
catch (Exception e)
{
retVal.Success = false;
retVal.Message = e.Message;
}
return retVal;
}
{
ResponseBase retVal = new ResponseBase();
try
{
throw new Exception("oops");
if (ValidRequest(request))
{
// Do we have any of this country?
string sql = string.Format("SELECT * FROM TestTable WHERE Country = '{0}'", request.Country);
DataSet ds = dbUtil.GetDataSet(sql);
// Update DB
if (ds != null && ds.Tables != null && ds.Tables.Count > 0 && ds.Tables[0].Rows.Count > 0)
sql = string.Format("UPDATE TestTable SET Count = {1} WHERE Country = '{0}'", request.Country, int.Parse(ds.Tables[0].Rows[0]["Count"].ToString()) + 1);
else
sql = string.Format("INSERT INTO TestTable VALUES('{0}',{1})", request.Country, 1);
dbUtil.GetDataSet(sql);
}
else
{
retVal.Success = false;
retVal.Message = "Invalid Request Credentials!";
}
}
catch (Exception e)
{
retVal.Success = false;
retVal.Message = e.Message;
}
return retVal;
}
Create a new folder called DataObjects, in there create a class called TableData like this
using System;
using System.Collections.Generic;
using System.Linq;
using System.Web;
using System.Data;
/// <summary>
/// Summary description for TableData
/// </summary>
public class TableData
{
public string Country { get; set; }
public int Count { get; set; }
public TableData()
{ }
public TableData(string country, int count)
{
Country = country;
Count = count;
}
public TableData(DataRow row)
{
Country = row["Country"].ToString();
int c = 0;
int.TryParse(row["Count"].ToString(), out c);
Count = c;
}
}
Now again, create a new class in the DataContracts folder called GetAllResponse deriving from ResponseBase like this
using System;
using System.Collections.Generic;
using System.Linq;
using System.Runtime.Serialization;
using System.ServiceModel;
using System.ServiceModel.Web;
using System.Text;
using System.Data;
/// <summary>
/// Summary description for GetAllResponse
/// </summary>
[DataContract]
public class GetAllResponse : ResponseBase
{
[DataMember]
IList<TableData> Data { get; set; }
public GetAllResponse()
{ }
public GetAllResponse(DataRowCollection rows)
{
Data = new List<TableData>();
foreach (DataRow row in rows)
Data.Add(new TableData(row));
}
}
Now we can create our new Web method to get it all for us, in the interface, set up the call like this
[OperationContract]
GetAllResponse GetAll(RequestBase request);
GetAllResponse GetAll(RequestBase request);
public GetAllResponse GetAll(RequestBase request)
{
GetAllResponse retVal = new GetAllResponse();
try
{
if (ValidRequest(request))
{
// Do our SQL stuff here
}
else
{
retVal.Success = false;
retVal.Message = "Invalid Request Credentials!";
}
}
catch (Exception e)
{
retVal.Success = false;
retVal.Message = e.Message;
}
return retVal;
}
{
GetAllResponse retVal = new GetAllResponse();
try
{
if (ValidRequest(request))
{
// Do our SQL stuff here
}
else
{
retVal.Success = false;
retVal.Message = "Invalid Request Credentials!";
}
}
catch (Exception e)
{
retVal.Success = false;
retVal.Message = e.Message;
}
return retVal;
}
public GetAllResponse GetAll(RequestBase request)
{
GetAllResponse retVal = new GetAllResponse();
try
{
if (ValidRequest(request))
{
string sql = "SELECT * FROM TestTable";
DataSet ds = dbUtil.GetDataSet(sql);
if (ds != null && ds.Tables != null && ds.Tables.Count > 0 && ds.Tables[0].Rows.Count > 0)
retVal = new GetAllResponse(ds.Tables[0].Rows);
else
{
retVal.Message = "There is no data in the table...";
}
}
else
{
retVal.Success = false;
retVal.Message = "Invalid Request Credentials!";
}
}
catch (Exception e)
{
retVal.Success = false;
retVal.Message = e.Message;
}
return retVal;
}
{
GetAllResponse retVal = new GetAllResponse();
try
{
if (ValidRequest(request))
{
string sql = "SELECT * FROM TestTable";
DataSet ds = dbUtil.GetDataSet(sql);
if (ds != null && ds.Tables != null && ds.Tables.Count > 0 && ds.Tables[0].Rows.Count > 0)
retVal = new GetAllResponse(ds.Tables[0].Rows);
else
{
retVal.Message = "There is no data in the table...";
}
}
else
{
retVal.Success = false;
retVal.Message = "Invalid Request Credentials!";
}
}
catch (Exception e)
{
retVal.Success = false;
retVal.Message = e.Message;
}
return retVal;
}
So, now we are going to put the service up on the interwebz so your applications can access it. First of all, if you did use the debug/remote access server address and port in your web.config file, switch it to the live IP and port now, if you forget, most FTP clients will let you edit files on the server, so it’s no big issue, just makes it a bit easier if you do it now.
Once you are all compiled and ready to go, you need to locate the MySql.Data.dll as this wont be present on the server, it will be in the GAC, so I found mine here “C:\Windows\Microsoft.NET\assembly\GAC_MSIL”, once you have located the assembly, create an ASP.NET Bin folder in the project ad copy the assembly across so it’s ready to go on the server, your solution should now look something like this

Now, I had a few issues setting mine up on my server as I had other web applications using an older version of the MySQL.Data.dll, to get round this I altered the reference to the assembly so it looked like this
<add assembly="MySql.Data, Culture=neutral"/>
So, we have the project all lined up and ready to be served on our server, fire up your FTP client and connect to your host, create a folder to hold the service, I just used the folder name my project is in RCTestWCFService, then just copy it all up. We are still not done, we need to now go over to our control panel and set up the folder as a virtual directory. With my host it’s a pretty simple thing to do, go into the Virtual Directories option off the main menu screen, select the Add New Virtual Directory tab and enter the names you want as the alias and the name you just transferred the service to and click Create virtual directory.

One more step and we will have our service up and running and that’s to refresh your application pool, I think that by default on my host your site is in a shared application pool, but from the dashboard you can switch to an isolated one, then simply hit the refresh application pool button.
So, now (if I have not took it down yet) you should be able to go and see my version of this test service running from my site here http://www.randomchaos.co.uk/RCTestWCFService/RCTestService.svc which should look something like this

And if you click the link at the top you will get to see the WSDL for the service, which will look like this

So that’s that, you have created a simple WCF Web service, now to look at setting up a WP7 Client to access this service.
XNA WP7 Client
So as I hope you by know, I am pretty much 100% XNA on this blog, so I am going to create the WP7 client in pure XNA. So, create your XNA WP7 project as you normally would, we then need to add a service reference, right click on the project and click Add Service Reference

In the Address paste the address of your service and hit the Go button, once the service has been discovered you can change the namespace that will be used in your project, I named mine RCTestService, then click OK

And that’s it, it’s now bound to the service and we can now make the web service calls from the client.
In the Game1 class I create a reference to the service just above the constructor like this
namespace RCTestWP7Client
{
/// <summary>
/// This is the main type for your game
/// </summary>
public class Game1 : Microsoft.Xna.Framework.Game
{
GraphicsDeviceManager graphics;
SpriteBatch spriteBatch;
RCTestService.RCTestServiceClient webService;
public Game1()
{
graphics = new GraphicsDeviceManager(this);
Content.RootDirectory = "Content";
{
/// <summary>
/// This is the main type for your game
/// </summary>
public class Game1 : Microsoft.Xna.Framework.Game
{
GraphicsDeviceManager graphics;
SpriteBatch spriteBatch;
RCTestService.RCTestServiceClient webService;
public Game1()
{
graphics = new GraphicsDeviceManager(this);
Content.RootDirectory = "Content";
So our Initialize method now looks something like this and we have two new methods
protected override void Initialize()
{
// TODO: Add your initialization logic here
base.Initialize();
webService = new RCTestService.RCTestServiceClient();
webService.UpdateServerCompleted += new EventHandler<RCTestService.UpdateServerCompletedEventArgs>(webService_UpdateServerCompleted);
webService.GetAllCompleted += new EventHandler<RCTestService.GetAllCompletedEventArgs>(webService_GetAllCompleted);
}
void webService_GetAllCompleted(object sender, RCTestService.GetAllCompletedEventArgs e)
{
throw new NotImplementedException();
}
void webService_UpdateServerCompleted(object sender, RCTestService.UpdateServerCompletedEventArgs e)
{
throw new NotImplementedException();
}
{
// TODO: Add your initialization logic here
base.Initialize();
webService = new RCTestService.RCTestServiceClient();
webService.UpdateServerCompleted += new EventHandler<RCTestService.UpdateServerCompletedEventArgs>(webService_UpdateServerCompleted);
webService.GetAllCompleted += new EventHandler<RCTestService.GetAllCompletedEventArgs>(webService_GetAllCompleted);
}
void webService_GetAllCompleted(object sender, RCTestService.GetAllCompletedEventArgs e)
{
throw new NotImplementedException();
}
void webService_UpdateServerCompleted(object sender, RCTestService.UpdateServerCompletedEventArgs e)
{
throw new NotImplementedException();
}
protected override void Update(GameTime gameTime)
{
// Allows the game to exit
if (GamePad.GetState(PlayerIndex.One).Buttons.Back == ButtonState.Pressed)
this.Exit();
if (!UpdatedServer)
{
UpdatedServer = true;
RCTestService.UpdateRequest req = new RCTestService.UpdateRequest();
req.UserName = "username";
req.Password = "password";
req.Country = System.Globalization.CultureInfo.CurrentCulture.Name;
webService.UpdateServerAsync(req);
}
base.Update(gameTime);
}
{
// Allows the game to exit
if (GamePad.GetState(PlayerIndex.One).Buttons.Back == ButtonState.Pressed)
this.Exit();
if (!UpdatedServer)
{
UpdatedServer = true;
RCTestService.UpdateRequest req = new RCTestService.UpdateRequest();
req.UserName = "username";
req.Password = "password";
req.Country = System.Globalization.CultureInfo.CurrentCulture.Name;
webService.UpdateServerAsync(req);
}
base.Update(gameTime);
}
public void ShowMessageBox(string title, string message)
{
Guide.BeginShowMessageBox(title, message, new string[] { "OK" }, 0, MessageBoxIcon.Alert, null, null);
}
{
Guide.BeginShowMessageBox(title, message, new string[] { "OK" }, 0, MessageBoxIcon.Alert, null, null);
}
void webService_UpdateServerCompleted(object sender, RCTestService.UpdateServerCompletedEventArgs e)
{
if (e.Result.Success)
ShowMessageBox("All Good", "Server was updated.");
else
ShowMessageBox("Error", e.Result.Message);
}
{
if (e.Result.Success)
ShowMessageBox("All Good", "Server was updated.");
else
ShowMessageBox("Error", e.Result.Message);
}
The variables we now have at the top of Game1 look like this
RCTestService.RCTestServiceClient webService;
List<RCTestService.TableData> getAllResponse = new List<RCTestService.TableData>();
TimeSpan checkTimeSpan = new TimeSpan(0, 1, 0);
TimeSpan lastCheck = DateTime.Now.TimeOfDay;
bool UpdatedServer = false;
List<RCTestService.TableData> getAllResponse = new List<RCTestService.TableData>();
TimeSpan checkTimeSpan = new TimeSpan(0, 1, 0);
TimeSpan lastCheck = DateTime.Now.TimeOfDay;
bool UpdatedServer = false;
void webService_GetAllCompleted(object sender, RCTestService.GetAllCompletedEventArgs e)
{
if (e.Result.Success)
{
getAllResponse = new List<RCTestService.TableData>(e.Result.Data);
}
else
ShowMessageBox("Error", e.Result.Message);
}
{
if (e.Result.Success)
{
getAllResponse = new List<RCTestService.TableData>(e.Result.Data);
}
else
ShowMessageBox("Error", e.Result.Message);
}
protected override void Update(GameTime gameTime)
{
// Allows the game to exit
if (GamePad.GetState(PlayerIndex.One).Buttons.Back == ButtonState.Pressed)
this.Exit();
if (!UpdatedServer)
{
UpdatedServer = true;
RCTestService.UpdateRequest req = new RCTestService.UpdateRequest();
req.UserName = "username";
req.Password = "password";
req.Country = System.Globalization.CultureInfo.CurrentCulture.Name;
webService.UpdateServerAsync(req);
}
else
{
if (DateTime.Now.TimeOfDay - lastCheck > checkTimeSpan)
{
lastCheck = DateTime.Now.TimeOfDay;
RCTestService.RequestBase req = new RCTestService.RequestBase();
req.UserName = "username";
req.Password = "password";
webService.GetAllAsync(req);
}
}
base.Update(gameTime);
}
{
// Allows the game to exit
if (GamePad.GetState(PlayerIndex.One).Buttons.Back == ButtonState.Pressed)
this.Exit();
if (!UpdatedServer)
{
UpdatedServer = true;
RCTestService.UpdateRequest req = new RCTestService.UpdateRequest();
req.UserName = "username";
req.Password = "password";
req.Country = System.Globalization.CultureInfo.CurrentCulture.Name;
webService.UpdateServerAsync(req);
}
else
{
if (DateTime.Now.TimeOfDay - lastCheck > checkTimeSpan)
{
lastCheck = DateTime.Now.TimeOfDay;
RCTestService.RequestBase req = new RCTestService.RequestBase();
req.UserName = "username";
req.Password = "password";
webService.GetAllAsync(req);
}
}
base.Update(gameTime);
}
protected override void Draw(GameTime gameTime)
{
GraphicsDevice.Clear(Color.Black);
spriteBatch.Begin();
spriteBatch.DrawString(Content.Load<SpriteFont>("Fonts/font"), string.Format("Next Check in {0} seconds", (checkTimeSpan - (DateTime.Now.TimeOfDay - lastCheck)).Seconds), Vector2.Zero, Color.Gold);
int cnt = getAllResponse.Count;
for (int l = 0; l < cnt; l++)
spriteBatch.DrawString(Content.Load<SpriteFont>("Fonts/font"), string.Format("{0} {1}", getAllResponse[l].Country, getAllResponse[l].Count), new Vector2(0, Content.Load<SpriteFont>("Fonts/font").LineSpacing * (l + 1)), Color.White);
spriteBatch.End();
base.Draw(gameTime);
}

And once it has gone and got all, looks something like this

Silverlight WP7 Client
So, I am updating this post to include the silver light client code, I am new to Silverlight on the WP7, so please forgive how crude I have been writing this client. It’s pretty much the same steps as the XNA client, we add a reference to the service, just as before, but we set the service up in code in the MainPage constructor like this
public MainPage()
{
InitializeComponent();
webService = new RCTestService.RCTestServiceClient();
webService.UpdateServerCompleted += new EventHandler<RCTestService.UpdateServerCompletedEventArgs>(webService_UpdateServerCompleted);
webService.GetAllCompleted += new EventHandler<RCTestService.GetAllCompletedEventArgs>(webService_GetAllCompleted);
RCTestService.UpdateRequest request = new RCTestService.UpdateRequest();
request.UserName = "username";
request.Password = "password";
request.Country = System.Globalization.CultureInfo.CurrentCulture.Name;
webService.UpdateServerAsync(request);
runThread = true;
timer.Start();
txtCounter.Text = string.Format("Data will be updated every {0} seconds.", checkTimeSpan.Seconds);
}
void webService_GetAllCompleted(object sender, RCTestService.GetAllCompletedEventArgs e)
{
if (e.Result.Success)
{
getAllResponse = new List<RCTestService.TableData>(e.Result.Data);
RunAsCrossThreadSafeCode(
delegate
{
txtData.Text = string.Empty;
foreach (RCTestService.TableData data in getAllResponse)
{
txtData.Text += string.Format("{0} {1}\n", data.Country, data.Count);
}
});
}
else
MessageBox.Show("Error", e.Result.Message, MessageBoxButton.OK);
}
void webService_UpdateServerCompleted(object sender, RCTestService.UpdateServerCompletedEventArgs e)
{
if (e.Result.Success)
{
MessageBox.Show("All Good", "Server was updated.", MessageBoxButton.OK);
}
else
MessageBox.Show("Error", e.Result.Message, MessageBoxButton.OK);
}
{
if (e.Result.Success)
{
getAllResponse = new List<RCTestService.TableData>(e.Result.Data);
RunAsCrossThreadSafeCode(
delegate
{
txtData.Text = string.Empty;
foreach (RCTestService.TableData data in getAllResponse)
{
txtData.Text += string.Format("{0} {1}\n", data.Country, data.Count);
}
});
}
else
MessageBox.Show("Error", e.Result.Message, MessageBoxButton.OK);
}
void webService_UpdateServerCompleted(object sender, RCTestService.UpdateServerCompletedEventArgs e)
{
if (e.Result.Success)
{
MessageBox.Show("All Good", "Server was updated.", MessageBoxButton.OK);
}
else
MessageBox.Show("Error", e.Result.Message, MessageBoxButton.OK);
}
static void callTimer()
{
while (runThread)
{
if (DateTime.Now.TimeOfDay - lastCheck > checkTimeSpan)
{
lastCheck = DateTime.Now.TimeOfDay;
RCTestService.RequestBase req = new RCTestService.RequestBase();
req.UserName = "username";
req.Password = "password";
webService.GetAllAsync(req);
}
Thread.Sleep(1);
}
}
{
while (runThread)
{
if (DateTime.Now.TimeOfDay - lastCheck > checkTimeSpan)
{
lastCheck = DateTime.Now.TimeOfDay;
RCTestService.RequestBase req = new RCTestService.RequestBase();
req.UserName = "username";
req.Password = "password";
webService.GetAllAsync(req);
}
Thread.Sleep(1);
}
}
/// <summary>
/// Method to run a delegate as cross thread safe code
/// </summary>
/// <param name="code">Code to be ran</param>
protected static void RunAsCrossThreadSafeCode(CrossThreadCode code)
{
using (AutoResetEvent are = new AutoResetEvent(false))
{
System.Windows.Deployment.Current.Dispatcher.BeginInvoke(() =>
{
// Code here
code();
are.Set();
});
are.WaitOne();
}
}
/// <summary>
/// Delegate used to run none cross thread safe code in a cross thread safe manor.
/// </summary>
protected delegate void CrossThreadCode();
/// Delegate used to run none cross thread safe code in a cross thread safe manor.
/// </summary>
protected delegate void CrossThreadCode();

And that’s pretty much it really. I know it seems like a lot to sort out and to take in at first, but once you have written a few services you will love it, I do :) I know I may go around the houses and do stuff the long winded way, so if you read this and have any advice or tips to add then please feel free to comment and let us all know how you stream line the process. Or you know of a great host for ASP.NET, share that too. If you have any issues creating your WCF service then let us know, you never know we might be able to help :P
Hope I have not scared you off of confused you when it comes to creating services for your game, and I hope this post helps you realize the potential you have in your game with web services.
ALL the source is available here [Not yet uploaded]
Subscribe to:
Posts (Atom)