Sunday, 8 July 2012
Programming in C# with XNA - Getting Started
I am going to assume you don’t even have the required tools on your machine to start coding. So what do you need to get going? You will need to install DirectX9, the latest XNA Game Studio and a C# compiler. You can find all these things in once handy place on the download page of the Creators Club.
What are these things you need to write games?
DirectX9
This bit of clever software is how we get our information to the graphics card (and so the screen). It’s a library of API’s (application programming interface) that gives us the ability to send information to the graphics card. I hear you say “hang-on! What’s an API??”. For the moment you are going to have to live with the description of it being an application interface, I will cover interfaces in a later post, for now, just know that it’s a mechanism for us to access the graphics card.
XNA Game Studio
This is what we will be working with directly. XNA is a wrapper to DirectX and gives us a nice way to connect to the graphics card and manipulate its output.
The first thing I suggest you do is make sure that the graphics card you have is powerful enough to do what we need to do. With this in mind I recommend that you install DirectX first. There are two possible downloads, the DirectX runtime libraries and the DirectX SDK (Software Developers Kit). I suggest installing the DirectX SDK first as this comes with a great tool called DXCapsViewer.exe. This awesome tool will tell you all the capabilities of your system and this is how we are going to know if our machine is up to the job. You also get a lot of resources with the SDK that don’t come with the runtime libraries, so I really recommend the SDK.
DXCapsViewer.exe
You will find this awesome tool in the ..\Utilities\bin\x86 folder of the Microsoft DirectX SDK folder. I installed mine to the default folder so on my machine it’s located here “C:\Program Files\Microsoft DirectX SDK (August 2008)\Utilities\bin\x86”. Run this super awesome tool and you get this screen:
As you can see it lists all my DirectX devices, graphics card, audio and input devices. What we want to check at the moment is the graphics device.
So, open up the card and you will see another set of folders, “Display Modes” and “D3D Device Types”, open up the “D3D Device Types”.
You can now see another two folders, “HAL” and “Reference”. I won’t explain these areas as they relate to how the graphics device is set up which is totally out of the scope of this post and indeed XNA as the lovely XNA will sort all that out for us.
Anyway, I digress, we will first open up the “HAL” folder. You will now see you have a “Caps” and “Adapter” folder, you won’t have to open the “Caps” one, just click on it once to select it, then scroll down to the bottom of the right pane.
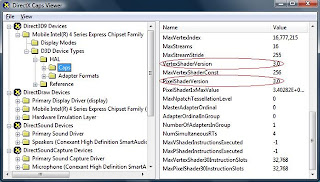
You will now see something like this:
What we are looking for here is the VertexShaderVersion and the PixelShaderVersion. Again, I won’t explain them yet, we just want to know if your card is up to the job at hand. Now, as we can see, I have a VertexShaderVersion of 3.0 and a PixelShaderVersion of 3.0. If you have a version in either of 0.0 means that the device may not support it, if this is the case then contact the manufacturer of the card to get more details.
So where does this leave you? If you have VertexShaderVersion or PixelShaderVersion lower than 2.0 then I would recommend upgrading your graphics card. If like me you have caps around 2.0 then you should be more than fine. Later when we write programs to run on your XBox 360, you won’t have to worry about this, the XBox 360 supports both VertexShaderVersion 3.0 and PixelShaderVersion 3.0.
Software Installation
So now you know if your machine is up to the job for this series of blog posts. You now need to install the rest of your software. Install Visual Studio C# 2008 Express Edition (you may come across this post much later on, so install the version of Visual Studio Express that is recommended on the Creators Club site) followed by the latest XNA Game Studio.
Previous | Next
Subscribe to:
Post Comments (Atom)


No comments:
Post a Comment